How to Create a Class in Objective-C
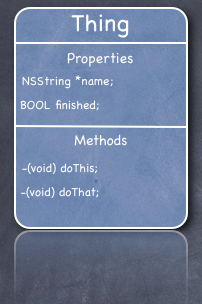
Anyone who is used to object-oriented programming will recognize the pattern demonstrated here. You will learn how to: use properties, allocate and de-allocate objects in memory, use a methods and you will see how to launch the Google Maps app on the iPhone with your address information.
Please note that their are many different ways and some subtleties to implementing a class in Objective-C that will not be discussed here. My goal is to show you the simplest way to get up to speed as soon as possible.
Address Class Introduction
The “Address” class simply stores address information such as street, city and zip code. Address will also return the correctly formated link that Google Maps needs to map the address location. Finally, Address will take the Google link, launch the Google Maps app and drop a pin at the location of the address.
NSObject Subclass
From XCode, select “File” and then “New File…”. You will see a dialog box come that looks like something like this: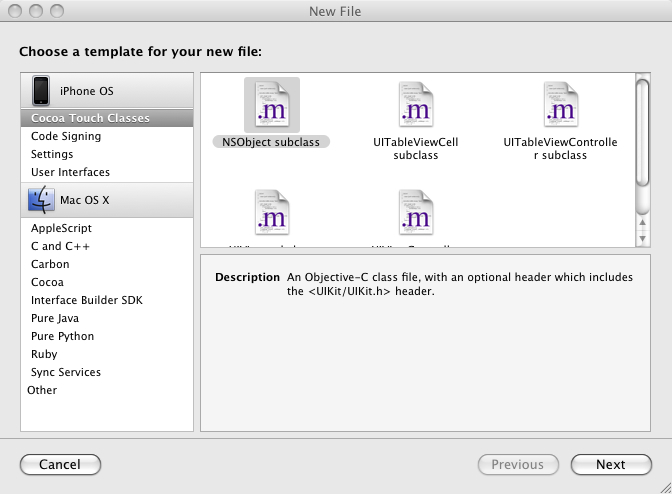
Choose NSObject subclass and call it “Address”. XCode will create two files for you: Address.h and Address.m. Classes have two files associated with them: the header file (“h” file extension) and the implementation file (“m” file extension).
The best way to think of the header file is that this is the place were you will define what your class does (but you do not implement anything here). Most of the coding will be done in the “m” file.
Add the Street, City and Zip Properties
In object-oriented programming, classes have properties and methods. Properties describe attributes of the thing represented by the class while methods are the class behaviors. The properties of the Address class are: Street, City, State and Zip – attributes that describe an address.
In Objective-C you must add code in a few places in both the header and implementation files in order to use properties.
In the header file you add code in two places:
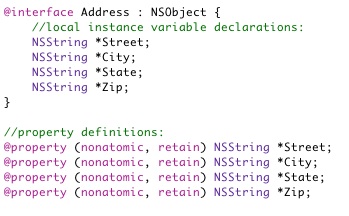
In the implementation file you need to “synthesize” the properties using @synthesize. It is also important to add code to release the memory associated with the properties in the class dealloc method.
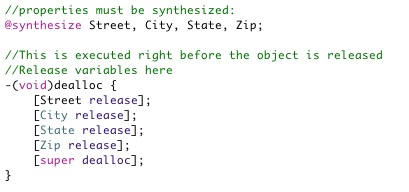
After you put your code in these four places your properties are ready to be used.
Detour: Using the Address Class Properties in Your Code
Now that you have properties defined in your address class you can use the class to create an object that stores address information. To keep things simple I will add the code right in the app delegate in the applicationDidFinishLaunching method. This is generally the first place you will add code to a new iPhone app.
NOTE: this file is the implementation file for you app delegate. It is usually named something like: “<yourProject>AppDelegate.m”.
First thing I had to do was add a reference to the Address header file I created. This goes at the very top and looks like this:
#import “Address.h”
Now, I simply need to add code to use an address object. The basic pattern is this: allocate memory, create object, use object and de-allocate memory. I will create an Address object, assign address information to it, write out that information to the log and finally I will de-allocate the memory associated with the Address object.
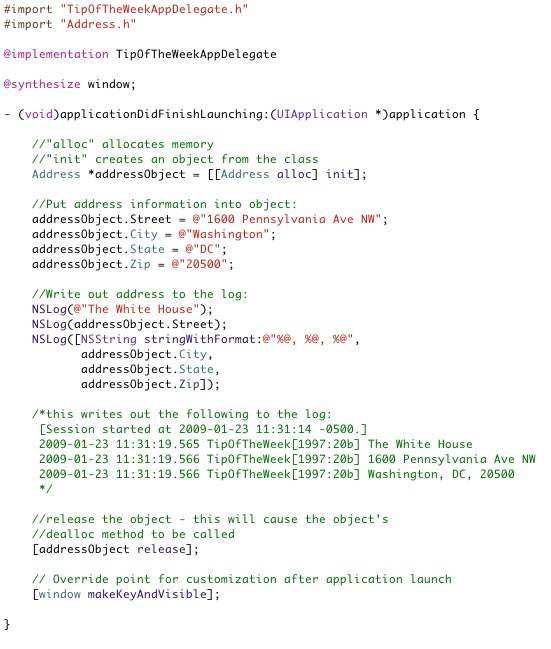
So, that is that – now you can create and use a class in Objective-C. Before we end I want to make this class a little bit more useful by adding a method to create the hyperlink that Google needs to find the address on the map. Then I want give my address objects the ability to launch the Google Map app on the iPhone with the address information contained in the object.
Launch Google Maps from the Address Class
In order to Google Map functionality to the Address class I need to do two things: create a function that will return the address information in string formatted to work with Google Maps and I need to create a method that will take that string and open the Google Maps app.
To create the function I add this to the header file:
and this to the implementation file: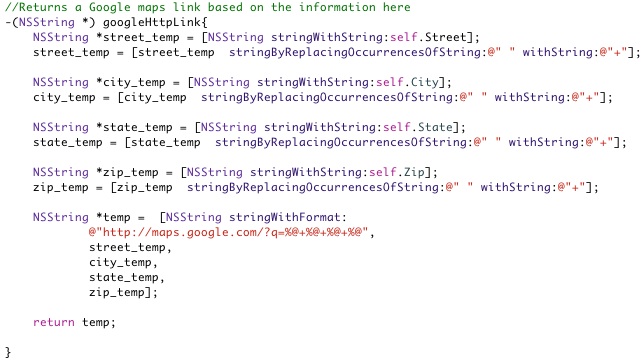
To add the method that opens up the Google Maps app I put this into the header file:
and this into the implementation file:
Conclusion + Where to Get the Files
So, that is it – you now should be able to create your own Objective-C classes to use in your iPhone projects and you have some clues about how to use the Google Maps app. I hope you enjoyed this tutorial. If you have any comments please put them in the form below.
Here is the link to the source code used for this tutorial: